Do you need help integrating the Authorize.net payment gateway into your PHP application? This article will help you do that, without much of frustration!
Authorize.net is indeed one of the most popular payment gateway on the internet. All the major eCommerce platforms like Magento, WooCommerce, and Opencart offers integration out of the box.
When it comes to Authorize.net integration there are two ways, SIM or Simple Integration Method is the first and most basic way. And AIM or Advanced Integration Method is the second and advanced way.
We are more interested with AIM route. It uses the REST API endpoints to process the payment. In this solution we are going to use the official Authorize.net PHP SDK.
You can download the complete solution from GIT repository , you can clone/download the repository to test the solution right away.
We will be following a very simple three step procedure to achieve the successful integration:
- Account Creation
- Composer & SDK
- Code and Testing
All the points are self explanatory. Let's get each of the point in detail now.
1 Account Creation
As we are just developing the solution, you may want to create a sandbox account to create and test your solution before going into production mode.
If you don't already have an sandbox account, you can create authorize.net sandbox account here .
On successful signup process, you should be able to get the API Login and Transaction ID. We will need these information in later part of our article. Keep them handy.
2 Composer & SDK
If you are not familiar with the Composer , it's a dependency resolver/injector utility for PHP. It makes a developer's life easy by automatically managing the dependency.
Why we need it?
Consider a case where a module of your web application is dependent on a third party library. But that library itself is dependent on eight other library and so on. How would you manage all those dependency altogether?
A simple answer is composer, you just need to create a composer.json file, write down you dependency and run composer update command. It will take care of all dependencies, install them for your and provide you an autoloading class.
As said earlier we will be using the Authorize.net's official PHP SDK , we will be using the composer to add dependency into our project.
Install the composer if not already. Create a new composer.json file under your project's root directory.
Your composer.json file should look this following:
{
    "require": {
        "php": ">=5.5",
        "ext-curl": "*",
        "phpunit/phpunit": "~4.0",
        "authorizenet/authorizenet": "1.9.0",
        "jms/serializer": "serializer-master-dev as 1.0"
    },
    "repositories": [{
        "type": "vcs",
        "url": "https://github.com/goetas/serializer.git"
    }],
    "autoload": {
        "classmap": ["constants"]
    }
}
Open command prompt or terminal, navigate to your project's root directory and run the composer install command.
If you are not comfortable with composer thing, you can download the official SDK and add it to your project.
Alternatively you can clone/download the GIT repository I have created for this project.
3 Code and Testing
If you have followed the above step correctly, your project directory should look like an image below:
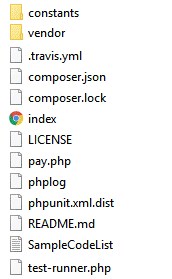
In case of composer setup, you should have a vendor directory which will store all the Authorize.net SDK classes and libraries. We will be using it in a minute.
In my case of composer based setup, I didn't get the constants directory. If this happens to you as well, please download the directory from my GIT repository.
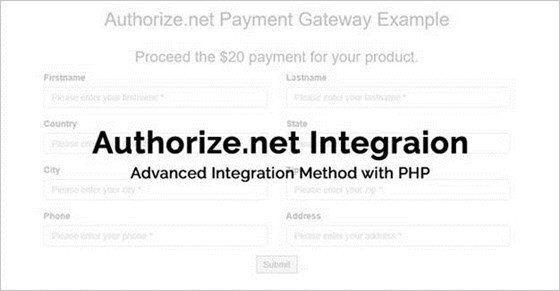
We will be creating two files for our solution. A pay.php file will be used to write to payment processing code that will utilize the SDK classes. Whereas the index.HTML file will be used to generate a form on screen.
We will display a form to our user, a user will enter the concerned information in the form and hit the Pay button. We will handle the rest of the payment procedure right from our pay.php file along with provided customer/user information.
Payment Processing Code:
I'll explain the code in the following section. Download the solution git repository I've mentioned earlier to look the pay.php code and read the explanation.
require 'vendor/autoload.php';
use net\authorize\api\contract\v1 as AnetAPI;
use net\authorize\api\controller as AnetController;
define("AUTHORIZENET_LOG_FILE", "phplog");
We have included the autoload.php file in the first line. It will handle the file inclusion for various classes and namespaces we will be using in the solution.
The AnetAPI will be used to create merchant object and handle merchant related functionality whereas the AnetController will be used the process the payment request.
Both the v1 and controller namespaces can be found under their respective directories contract and controller under the vendor/authorizenet/authorizenet/lib/net/authorize/api/ directory.
And lastly we define the log file path. If you keep the filename and path intact you will find a file phplog under your root project directory. Your transaction related activity will be logged here.
Please go through the index.html file before proceeding any further. You will get to know about the input fields we have with the form fields.
$amount = \SampleCode\Constants::SAMPLE_AMOUNT;
if (!empty($_POST['amount']))
    $amount = $_POST['amount'];
if (!defined('DONT_RUN_SAMPLES'))
    chargeCreditCard($amount);
We are setting up the $amount variable, we will be using the default amount from constants file if we don't find it from the form post.
We are calling the chargeCreditCard function along with defined amount. The function actually has the payment process code. Let's explore it.
Charge Credit Card Function
Let's get the payment processing function code now:
// Common setup for API credentials
$merchantAuthentication = new AnetAPI\MerchantAuthenticationType();
$merchantAuthentication->setName("\SampleCode\Constants::MERCHANT_LOGIN_ID");
$merchantAuthentication->setTransactionKey("\SampleCode\Constants::MERCHANT_TRANSACTION_KEY");
$refId = 'ref' . time();
We need to setup who is the merchant and if it was a successful transaction who will receive the money. So the code block is used to identify the merchant.
The first line will create a merchant object of MerchantAuthenticationType class. The next two line of code are setting up the Login Id and Transaction Key for the merchant object.
Have you kept those Login Id and Transaction Key handy?
Please open the constants file under the constants directory and modify those value with your's.
// Create the payment data for a credit card
$creditCard = new AnetAPI\CreditCardType();
$creditCard->setCardNumber("4111111111111111");
$creditCard->setExpirationDate("1226");
$creditCard->setCardCode("123");
$paymentOne = new AnetAPI\PaymentType();
$paymentOne->setCreditCard($creditCard);
$order = new AnetAPI\OrderType();
$order->setDescription("New Item");
To make the code and testing things faster we are not asking user for credit card information. Authorize.net provide us some mock credit card number to process the transaction under test mode.
We are setting up the creditCard and order object with mock card details and order description.
//create a transaction
$transactionRequestType = new AnetAPI\TransactionRequestType();
$transactionRequestType->setTransactionType("authCaptureTransaction");
$transactionRequestType->setAmount($amount);
$transactionRequestType->setOrder($order);
$transactionRequestType->setPayment($paymentOne);
We are heading towards the transaction execution, but before executing transaction we need to create an instance and set it's required properties with respective information.
We will be setting the TransactionType to authorize and capture transaction once, order amount, order details, and customer's credit card information.
Let's prepare the customer's information object:
//Preparing customer information object
$cust = new AnetAPI\CustomerAddressType();
$cust->setFirstName($_POST['fname']);
$cust->setLastName($_POST['lname']);
$cust->setAddress($_POST['address']);
$cust->setCity($_POST['city']);
$cust->setState($_POST['state']);
$cust->setCountry($_POST['country']);
$cust->setZip($_POST['zip']);
$cust->setPhoneNumber($_POST['phone']);
$cust->setEmail("Email-here");
Customer information is required when you are executing a payment processing. The payment gateway uses this information to generate a receipt for the customer and email it.
We now have all the required information, let's execute the transaction now.
$transactionRequestType->setBillTo($cust);
$request = new AnetAPI\CreateTransactionRequest();
$request->setMerchantAuthentication($merchantAuthentication);
$request->setRefId($refId);
$request->setTransactionRequest($transactionRequestType);
$controller = new AnetController\CreateTransactionController($request);
$response = $controller->executeWithApiResponse(\net\authorize\api\constants\ANetEnvironment::SANDBOX);
To execute a transaction we need to create an instance of CreateTransactionRequest class.
We need to provide the instance of customer information, merchant information, and transaction request.
The executeWithApiResponse function will send the payment request to payment gateway server and stores the response from the payment server into the $response variable.
The rest of the nested condition block is used to identify the transaction status whether it was successful or failure. If we receive the response OK then everything went right and transaction was successful!
Conclusion:
Integrating Authorize.net AIM is really simple. You need the SDK and a payment processing file and you good to go!
The process is also very simple, we create customer, order, card and transaction information and send it to payment server.
Based on provided values we get a definite response. It should be OK in most cases except you did something wrong with configuration.