VMWare VCloud - An Introduction
vCloud is a cloud service management interface developed by VMware that can be used to create a dedicated virtualized environment. Using VMWare vSphere and vCloud Hybrid Service together, you can seamlessly integrate your virtual data-center with a cloud computing environment.
It can take care of optimal CPU placement, memory utilization, storage capacity, security settings and performance tuning across cloud resources.
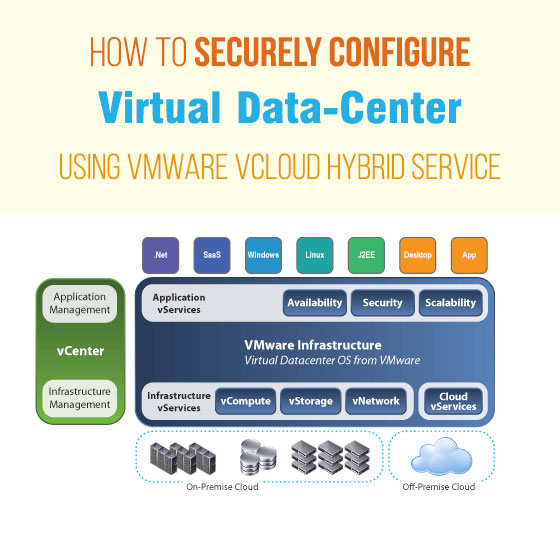
With integrated features like virtual data-center, disaster recovery, downtime-less maintenance, VPN tunneling, role-based security and identity management, VMWare vCloud is an all-in-one solution for creating a truly elastic cluster of cloud servers.
Creating a Virtual Data-Center With VMWare VCloud
This tutorial will guide you through the step-by-step procedure of creating your first Virtual Data-Center using VMWare vCloud Hybrid Service through the web-based portal.
Prerequisites:
1. Access to a dedicated Cloud Hosting Environment powered by VMWare.2. Valid user credential to login to vCloud with administrative rights.
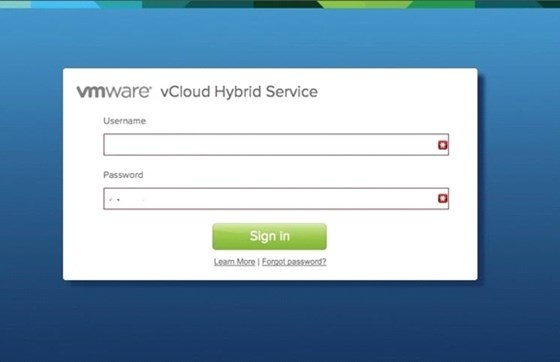
Step #1: Login To VCloud Hybrid Service
Open a web browser program and go to the vCloud Hybrid Service URL as provided by your cloud hosting service provider. Enter your username/password and click on the 'sign In' button.
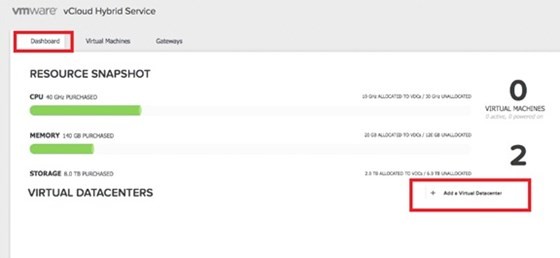
Step #2: Add a Virtual Datacenter
Click on the 'Dashboard' tab using the top navigation menu. Scroll down to 'Virtual Datacenters' section. Click on the link 'Add a Virtual Datacenter'.
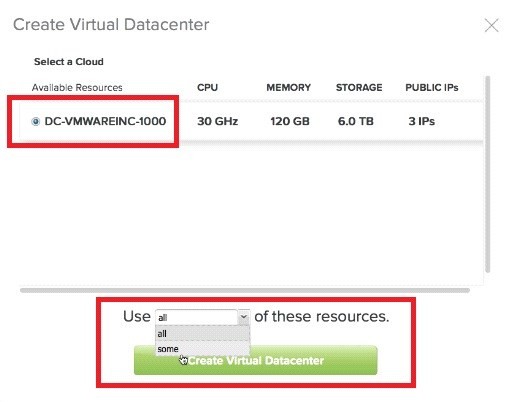
Step #3: Select a Dedicated Cloud Resource To Host the Datacenter
You will be prompted to select a Dedicated Cloud to place your new data-center. Click on the radio button adjacent to the desired Dedicated Cloud and then scroll down to allocate resources using the drop-down menu. You can either allocate all available resource or a part of it.
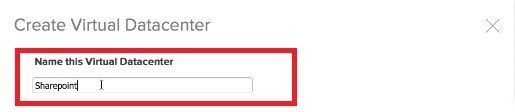
Step #4: Naming Your Virtual Data-Center
Enter a name for your data-center in the text box below 'Name this Virtual Datacenter'.
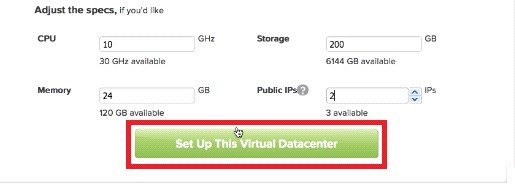
Step #5: Adjust Resource Allocation
If you have selected to use only a part of the available resources in Step #3, then here you can specify the exact amount of CPU, Storage, Memory and IP addresses. Once you are done with the resource allocation, click on the button 'set Up This Virtual Datacenter' to launch the new virtual data-center.
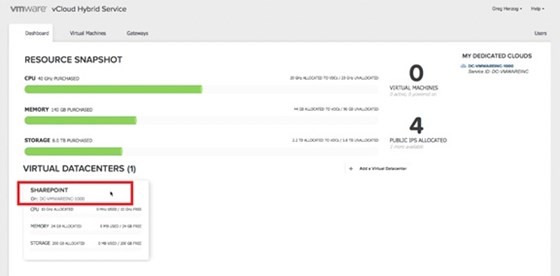
You will be provided with a 'Resource Snapshot' to validate the details of your newly created virtual data-center.
With this you are done with the creation of your virtual data-center. To make it fully functional, you need to configure the settings now. Configuration options include resource allocation, storage usage, network gateway setup, IP address allocation and user access/restrictions settings.
Configuring a Virtual Data-Center With VMWare VCloud
Step #6: Select the Virtual Data-Center
Go back to the dashboard page on vCloud. You can find the newly created virtual data-center listed over there. Click on the data-center to open the configuration details.
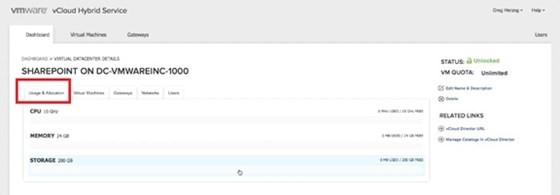
Step #7: Usage & Allocation
Click on the tab 'Usage & Allocation' under the 'Virtual Datacenter Details'. Here you can make adjustments to the CPU, memory and storage allocation. A new pop-up window will appear upon clicking each of the parameters where you can enter new values. Finally click on the 'save' button after making all the changes.
Step #8: Configuring the Network Gateways
Click on the 'Gateways' tab. Here you need to enter values for gateway IP and Public IP. Contact your hosting service provider to get the details. Save the details before moving to the next tab.

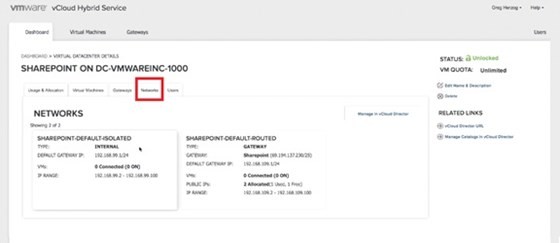
Step #9: Validate Networks Tab
As soon as you have configured the network gateways in Step-8, the 'Networks' tab will list two default networks - isolated and public. These will be created automatically, so you need not have to do any changes here. Move over to the final tab now.
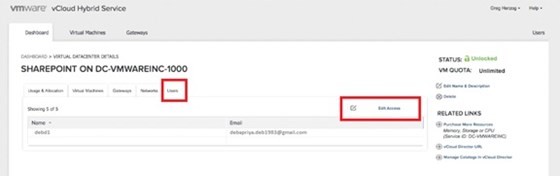
Step #10: Configuring Users
The last tab is for configuring users. By default, your admin account will be listed here. You can create new users by clicking on the edit link. 'Edit Access' link can be used to implement access control restrictions for each of the users. Once you are done with setting up the user accounts and providing them with necessary access rights, click on the 'save' button for the changes to take effect.
With this you have successfully configured all the required settings and parameters in your new virtual data-center. You can validate the configuration details by going back to the 'Dashboard' interface and clicking on this particular 'Virtual Datacenter' link.
Now your virtual data-center is fully functional and ready for use.